1、安装python3 3.10.9版本
下载地址 https://mirrors.aliyun.com/python-release/windows/python-3.10.9-amd64.exe
安装时不要勾选 Add to path ,选择自定义安装,安装目录为D:\02soft\python310
配置pypi源
阿里云Pypi源地址:PyPI镜像-PyPI镜像下载安装-开源镜像站-阿里云
新建"C:\Users\73277\pip\pip.ini"文件,其中73277为我的用户名
在文件中写入以下内容:
[global]
index-url = https://mirrors.aliyun.com/pypi/simple/
[install]
trusted-host = mirrors.aliyun.com
保存并关闭文件。
2、下载模型
显卡4G内存以下 选择0.6B模型,4G以上选择1.7B模型。
Qwen3-TTS全面开源:支持超低延迟流式合成的多语言语音大模型 · 研习社
#创建项目目录
D:\08pythonproject\qwentts
#创建虚拟环境
D:\08pythonproject\qwentts>"D:\02soft\python310\python.exe" -m venv venv-python310
#激活虚拟环境
D:\08pythonproject\qwentts>venv-python310\Scripts\activate
#升级PIP
python.exe -m pip install --upgrade pip
#安装modelscope
pip install modelscope
#创建模型存放目录
"D:\07modeles\TTS\Qwen\Qwen3-TTS-12Hz-1.7B-CustomVoice"
#下载整个模型repo到指定目录
modelscope download --model Qwen/Qwen3-TTS-12Hz-1.7B-CustomVoice --local_dir "D:\07modeles\TTS\Qwen\Qwen3-TTS-12Hz-1.7B-CustomVoice"
modelscope download --model IndexTeam/IndexTTS-2 --local_dir "D:\07modeles\TTS\IndexTeam\IndexTTS"
3、安装显卡驱动
根据显卡型号和对应系统 下载驱动进行安装。
驱动下载地址:NVIDIA GeForce 驱动程序 - N 卡驱动 | NVIDIA
CUDA Toolkit下载地址:CUDA Toolkit Archive | NVIDIA Developer
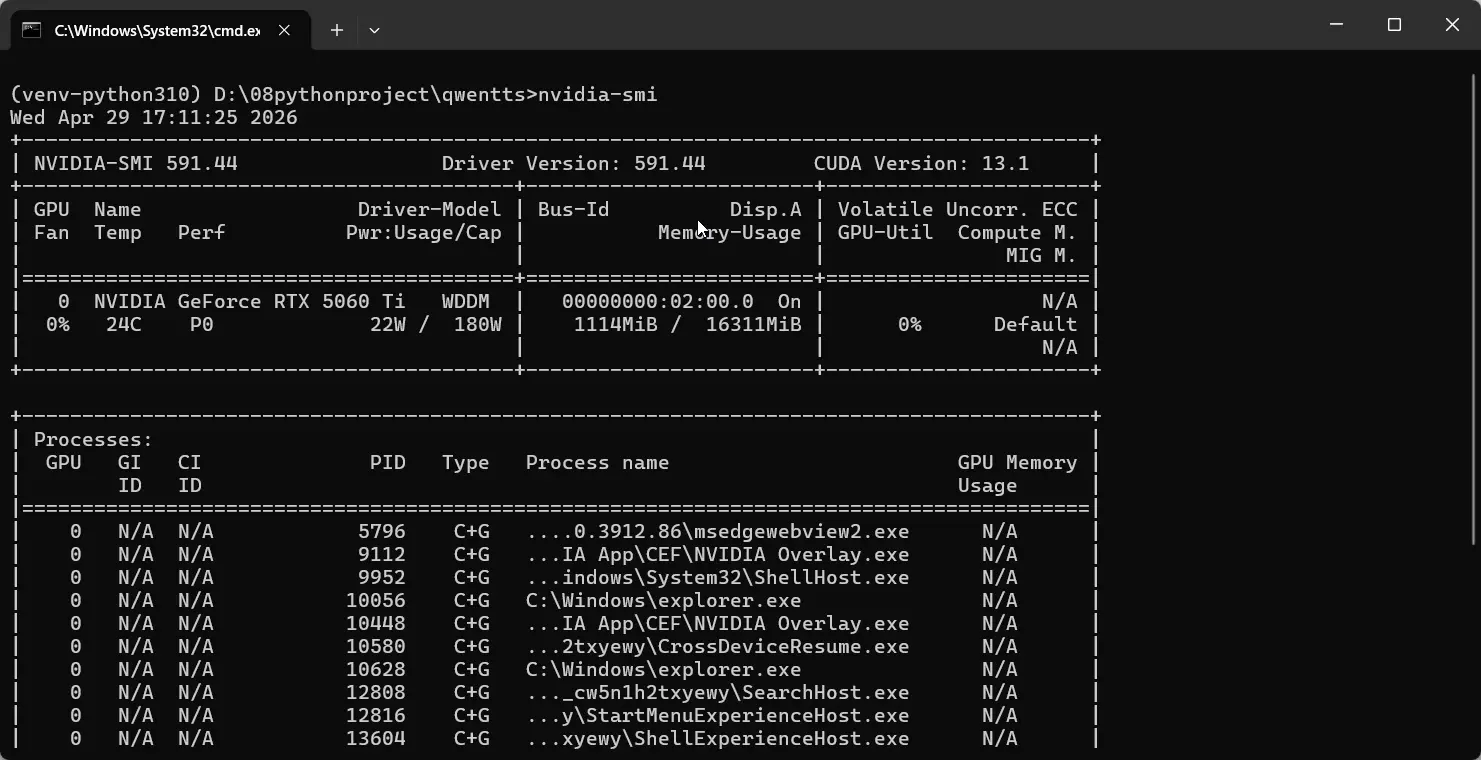
显卡驱动安装好以后,打开cmd 输入nvidia-smi命令查看显卡信息,如下CUDA Version:13.1 则 Pytorch的CUDA版本需要选择小于13.1的,我这里选择12.8版本
4、安装 torch torchvision torchaudio
Pytorch官网 PyTorch
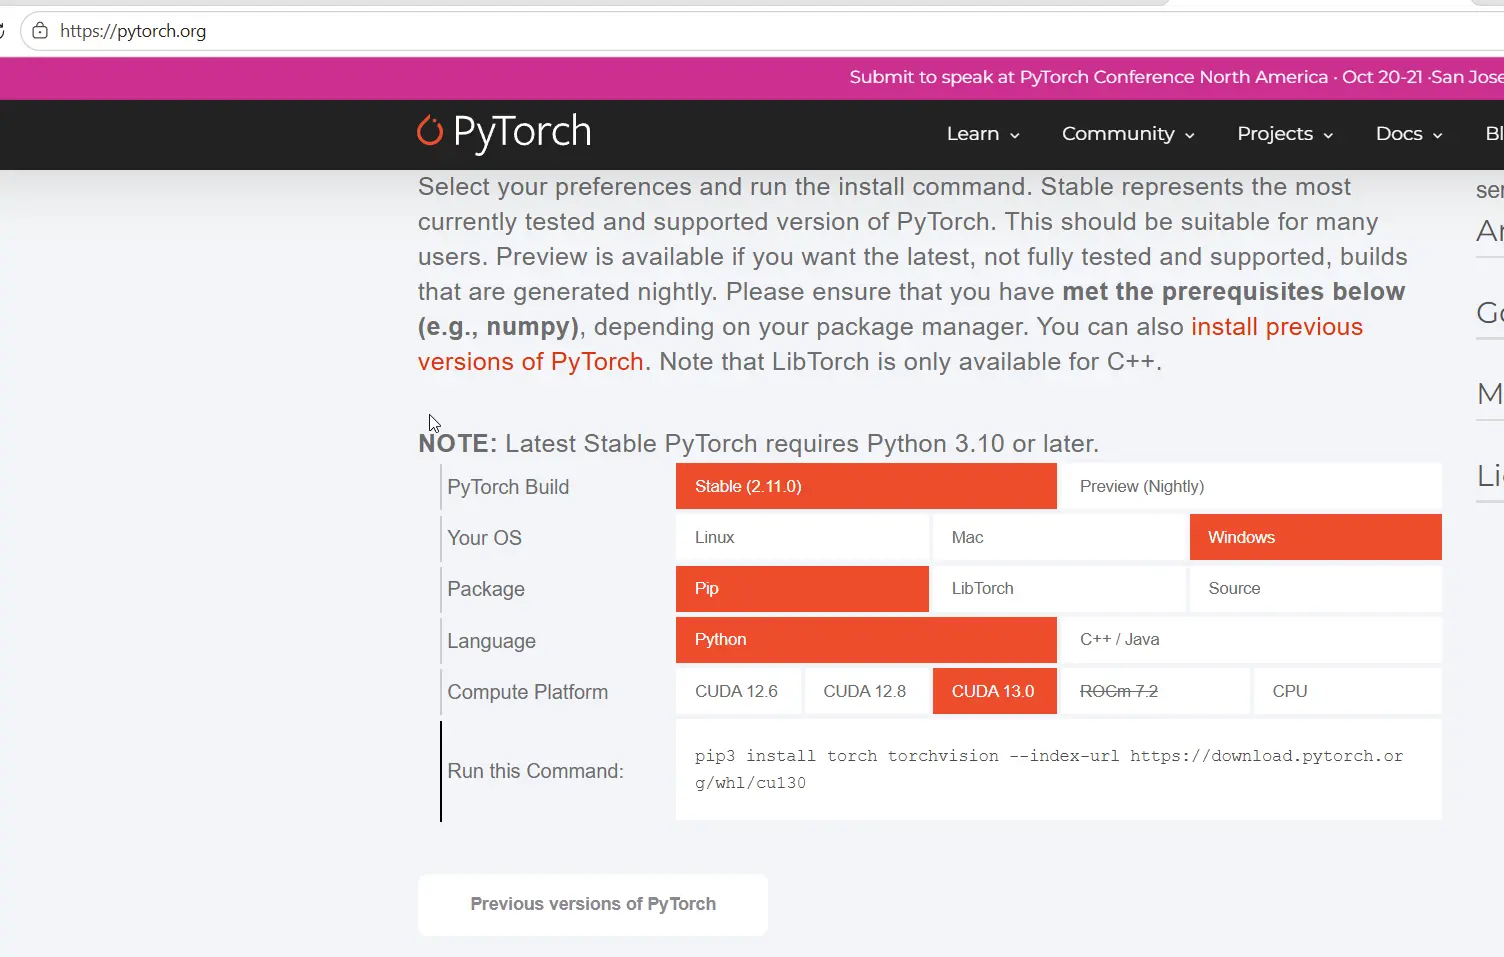
进入项目目录D:\08pythonproject\qwentts,激活虚拟环境。安装以下包:
pip uninstall torch torchvision torchaudio -y
#Pytorch官方下载方式,并指定版本window
pip install torch==2.8.0+cu128 torchvision==0.23.0+cu128 torchaudio==2.8.0+cu128 --index-url https://download.pytorch.org/whl/cu128
#Pytorch官方下载方式,并指定版本linux
pip install torch torchvision torchaudio --index-url https://download.pytorch.org/whl/cu128
#50系列显卡推荐安装预览版本
pip3 install --pre torch torchvision --index-url https://download.pytorch.org/whl/nightly/cu130
#https://mirrors.aliyun.com/pytorch-wheels/nightly/cu130/
pip3 install --pre torch torchvision --index-url https://mirrors.aliyun.com/pytorch-wheels/nightly/cu130/
#torch-2.10.0.dev20250927+cu130-cp310-cp310-win_amd64.whl
#torchaudio-2.10.0.dev20251018+cu130-cp310-cp310-win_amd64.whl
#torchvision-0.25.0.dev20250927+cu130-cp310-cp310-win_amd64.whl
#阿里云的镜像,下载有问题
pip install torch==2.8.0+cu128 torchvision==0.23.0+cu128 torchaudio==2.8.0+cu128 --index-url https://mirrors.aliyun.com/pytorch-wheels/cu128/
#可以试试南京大学的
pip3 install torch==2.8.0+cu128 torchvision==0.23.0+cu128 torchaudio==2.8.0+cu128  --index-url https://mirrors.nju.edu.cn/pytorch/whl/cu128

#也可以将whl文件下载到本地通过pip install *.whl进行安装,[推荐使用这个方式]
访问https://mirrors.aliyun.com/pytorch-wheels/cu128/ 下载以下3个文件
torch-2.8.0+cu128-cp310-cp310-win_amd64.whl
torchaudio-2.8.0+cu128-cp310-cp310-win_amd64.whl
torchvision-0.23.0+cu128-cp310-cp310-win_amd64.whl
然后执行pip install 安装
pip install ./torch-2.8.0+cu128-cp310-cp310-win_amd64.whl ./torchaudio-2.8.0+cu128-cp310-cp310-win_amd64.whl ./torchvision-0.23.0+cu128+cu128-cp310-cp310-win_amd64.whl
5、语音合成
下载安装VScode Visual Studio Code - The open source AI code editor | Your home for multi-agent development
安装好VScode以后需要再VScode中安装一下Python插件
进入项目目录D:\08pythonproject\qwentts,激活虚拟环境。安装以下包:
# 安装核心包
pip install -U qwen-tts
pip install  soundfile
# 可选:加速推理(需兼容硬件)
#pip install -U flash-attn --no-build-isolation
##windwos安装不了flash-attn 。需要使用github上whl文件来手动安装
1、访问 https://github.com/kingbri1/flash-attention/releases?spm=5176.28103460.0.0.38f97d83KzpinH
#更全面的flash-attn。https://github.com/mjun0812/flash-attention-prebuild-wheels/releases?page=3
2、下载flash_attn-2.8.3+cu128torch2.8.0cxx11abiFALSE-cp310-cp310-win_amd64.whl到项目目录。其中cu128对应 cu128 torch2.8对应torch2.8.0 cp310对应python3.10
3、安装 flash-attn
# 先确保已经正确安装了 torch 2.8.0 + cu128
pip install torch==2.8.0+cu128 torchvision==0.23.0+cu128 torchaudio==2.8.0+cu128 --index-url https://download.pytorch.org/whl/cu128
# 然后使用 --no-deps 参数安装 flash_attn
pip install .\flash_attn-2.8.3+cu128torch2.8.0cxx11abiFALSE-cp310-cp310-win_amd64.whl --no-deps
使用Vscode进入项目目录D:\08pythonproject\qwentts创建demo.py 代码如下
import torch
import soundfile as sf
from qwen_tts import Qwen3TTSModel

# 加载模型(自动下载,也可本地指定路径)
model = Qwen3TTSModel.from_pretrained(
    r"D:\05models\Qwen\Qwen3-TTS-12Hz-0.6B-CustomVoice",
    device_map="cuda:0",
    dtype=torch.bfloat16,
    #attn_implementation="flash_attention_2"
)

# 生成!
wavs, sr = model.generate_custom_voice(
    text="其实我真的有发现,我是一个特别善于观察别人情绪的人。",
    language="Chinese",
    speaker="Vivian",
    instruct="用特别开心的语气说"
)

# 保存
sf.write("output2.wav", wavs[0], sr)
试试Web界面(可选)
qwen-tts-demo Qwen/Qwen3-TTS-12Hz-1.7B-CustomVoice --port 8000
qwen-tts-demo D:\07modeles\TTS\Qwen\Qwen3-TTS-12Hz-1.7B-CustomVoice --port 8000  --no-flash-attn
# 浏览器打开 http://localhost:8000